
This has by far been the wildest trip yet. Never have I thought I’d be backpacking almost 40 miles through the Californian wilderness. It was very hard work and the most brutal hike I’ve ever done. This was my second time backpacking. My first time was Kalalau in the Na Pali coast of Kauai. I’m happy to have more companions the second time around (total of 5 people this time vs. 3)! It’s important to travel with people you trust that share the same agenda. I traveled with my long time friends Kahlil (the trip planner), Christian, Damon, and Aaron. Yes, I was the only girl.
Unfortunately, there has been an ongoing wildfire in Yosemite Valley that heavily affected the air quality. We would experience clear mornings and the fire’s smoke would roll in in the mid-afternoon and remain for the rest of the day. On the flip side, the fire was nowhere near the areas we were hiking. We hiked the High Sierra Loop trail, pictured below. This is just one of many trails! This particular one took us to elevations over 10,000 feet over sea level. 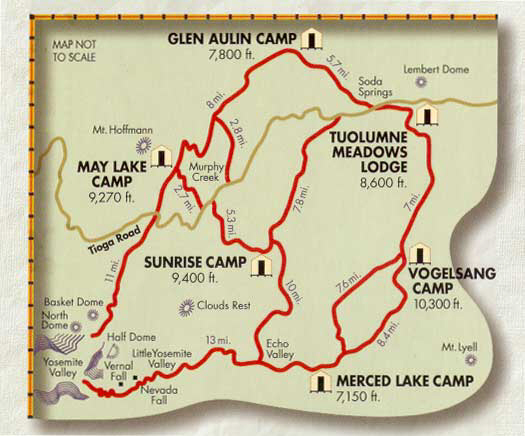
We chose this because it gave us the most views for our 5-day stay. If you are interested in learning about other backpacking trails in Yosemite, click here.
We travelled clockwise with the trail in order to have an easy last day completing the loop because of the elevation going downhill. Our trip planner, Kahlil, miscalculated our stay and we didn’t do the entire loop. We needed an extra day to do so, which we didn’t have. So we had to settle with ending our loop from Sunrise to Tuolumne Meadows, stopping at Cathedral Lakes in between.
How I Prepared
Keep in mind, the camp gear that was communal were distributed amongst all 5 of us. For example, we each carried components of the tent that we shared. I was in charge of bringing the pot that we used for our meals, while Kahlil carried the portable stove and water filter, and Christian carried a second water filter, etc.
ESSENTIALS:
 Hiking backpack- mine was undersized for the amount of days we hiked at 50L. I highly recommend 65L or bigger.
Hiking footwear This is SUPER IMPORTANT. You do not want a shoe that breaks on you during a hike! The brand I bought is Columbia, from a Sports Authority! Here is a link to the same style I have. They fit slightly big, I had to add an insole. But they last for a while, has good grip, and keeps your feet dry even when stepping in a puddle
Sleeping bag- Our elevations brought us chilly conditions. We bought a sleeping bag rating 35-40 degrees Fahrenheit. Click here for the link!
Sleeping pad- I got a Moon Lence brand in green through amazon. It was easy to set up and pack. I found moderate comfort when lying on it with my sleeping bag. Click here for the link.
 Tent- We carried two 4-person tents for the 5 of us. We over-packed for the luxury of space.
Camping chair- this is not necessary, it is more of a luxury item. Mine was a Helinox One (link ). This was pricy compared to what my companions spent. A cheaper of a similar kind works well too.
Bear canister- By law, we must store all fragrant items in this, not just food. We rented one from the national park. It was solid black,very heavy and took up a lot of space in my 50L. If you are serious about backpacking, buy your own that’s light-weight and clear.
Water filter- There are a lot of brands in the realm of water filtration. We had two 4-Liter Platypus GravityWorks Water Filter System.
Aluminum cooking pot- We got aluminum for its lightweight quality. We had one that was 4.5L, purchased through Amazon. It worked well for a our group! This is the link.
Portable stove and fuel- You can’t have camp fires below 6,000 or above 9600 feet above sea level, so these are necessary if you are traveling in that bracket. We bought ours’ at an REI in San Francisco. The exact one is linked here.
Collapsible bowl- There are many sizes to choose from on Amazon. I purchased one meant for dogs (lol) because of its width, but I found that it wasn’t that much of an advantage. However, here is the link to what I got.
Light water bottle or a bladder- I used a disposable plastic water bottle.
Eating utensil- I bought my camping spork locally at Climb Aloha
Toilet paper- 1 roll, depends on how much you use in a sitting.
Trowel- I didn’t carry my own, but here’s a link to one similar to what I used
First Aid Kit
Headlamp/Flashlight- A flashlight is good but a headlamp is better
Sunblock and Sunglasses – protect yourself from the Sun!
Trash bag – You pack out what you pack in, including trash! Get one that’s heavy-duty so there are no leaks in your backpack.
FOOD:
Breakfast and dinner were consumed at our campsite. We had lunch in the middle of our hike off the trail, under some trees next to a beautiful waterway.
Meals: We needed 14 meals for our stay of 5 days. We had..
- 8 single servings of oatmeal for breakfast (two servings per sitting)
- a total of 7 packaged freeze-dried meals by Mountain House and Backpacker’s Pantry
- Mountain House- Teriyaki Chicken, Chili Mac (my favorite), Spaghetti with Meat sauce, Pasta Primavera, and Lasagna
- Backpacker’s Pantry- Pad Thai (least favorite) and Chicken Risotto
- Homemade dehydrated pork and beans (Thank you Kahlil)
- 1 Precooked package of Chicken Marsala accompanied by 1 precooked package of rice.
- Instant ramen
- Instant Macaroni and Cheese
Snacks
- Trail mix
- Beef sticks and Jerky
- Clif Bars
- Christian brought a small squeeze bottle of peanut butter- it was a good call
CLOTHING:
Keep in mind, there is no plumbing in the wild which means no showers. The only time you can bath is when you come across a lake or river. DO NOT USE SOAP. Another thing to remember, you can always launder your clothes in these water ways. And again, DO NOT USE SOAP. I ended up overpacking by bringing 7 pairs of underwear, 4 pairs of wool socks and a denim jacket. Do not do what I did, you will suffer like me. I am only going to list what was necessary.
- 1 Hiking outfit
- Tank top
- Hiking pants- Convertible hiking pants are the best. I bought mine through Amazon in green, linked here
- 2 Evening/Sleeping outfit- 2 because I wore them all at once during the coldest nights. But if you can cut it down to 1, do it! I did not carry any sports tech-wear such as an insulated sweater, which is the reason why I carried more clothes than I truly needed.
- 3 pairs of underwear
- 2 pairs of wool socks
- Bathing suit
- A Beanie
The Permit Process
We were unable to obtain camping permits prior to our trip. It didn’t mean we had to sneak in to do this. We simply just had more steps to take in order to do it.
After arriving in SFO at approximately 3:00 pm, we picked up our Turro rental and grabbed last-minute supplies at an REI on Market St. Then, we booked it to Groveland (3 hour drive) and stayed overnight at Yosemite International Hostel.
We left the hostel at about 5am and headed into Yosemite National Park towards Tuolumne Meadows where the ranger’s office was. The reason why we left very early is because we had to wait in a line outside the office for our permits and we had no idea how busy it was going to be. The office opened at 8 am, however, permits don’t get issued until 11 am. We made it to the office around 7 am and there was about 8 people already in line! If we had come later, we may have not gotten out trail of choice and would have had to settle for a different trail. But lucky for us, that didn’t happen!
Ranger Adam Teit was the main guy managing everything. He had a quirky personality and read aloud some poems written about Yosemite that really got us into the hiking spirit! I remember a quote he read which was,
“The older you get, the further you must walk for wood”
The other hikers waiting in line also had some personalities that really got me thinking about the kind of people who gravitate towards these sorts of activities. I find that they are high-spirited individuals that truly get a kick out of the simple things in life, like trees. I admire that.
Anyways, once we got our permits locked we had to rent bear canisters. Normally, they cost $5 with a $90 deposit. However, we got ours’ for free because of the inconveniences of that wildfire. Talk about customer service! We had the option to start our trail that day, however, we decided to thoroughly repack our backpacks and find a way to fit all of our food in the bear canister. That didn’t take all day so we did a day hike into Soda Springs for a little taste of what was to come. We camped at the camper’s lodge that night and had skipped dinner and went straight to sleep. We were absolutely exhausted.
The Hike
Day 1 – Tuolumne to Vogelsang
- The map says 7 miles but we actually traveled further to our camp site as well as a detour. We traveled about 8.5-9 miles.
- Level : Advanced/Strenuous
- It starts off as a gradual uphill for 2 miles and then becomes extremely steep with a lot of switch-backs and levels a bit for a few miles of lush greenery before entering a more mountainous terrain
- We took a little detour at Vogelsang’s High Sierra Camp (a lodging rental) and took a visit to Fletcher Lake, Vogelsang Lake was just 1.5 miles away.
- We camped a little distance from Lake Vogelsang. The closest we can camp to water is 100 feet.
- The views were amazing, I’ve never witnessed such pristine wildlife!
- Time taken (includes lunch break+detour) : ~9 hours
Day 2 – Vogelsang to Merced
- The distance was 7 miles from where we camped
- Level : Moderately Strenuous
- Starting as an uphill over Vogelsang’s mountain ridge, we were hiking along a cliff’s edge until a gradual downhill turned into steep switch-backs for miles until we reached the bottom of the mountain that leveled into a lush greenery along a network of small streams. Then, we were back to steep uphill switch-backs and steep downhill switchbacks until leveling out again finally reaching Merced.
- Time taken (includes lunch break) : ~7 hours
Day 3 – Merced to Sunset
- 10 miles
- Level: Advanced/Strenuous
- Starts off as a gradual downhill along a stream for about 2 miles. The rest is brutal. All very steep uphill switch-backs of rocky, treacherous terrain. This trail is very dry, meaning that there are no sources of water after leaving Merced.
- The trail was quite lush with greenery starting off, then as we increased our elevation it becomes less shaded from a lack of trees on a dry, dirt path.
At this point, my body was stressed. I ran out of water on this trail and found myself weakening. We had to skip lunch because of the lack of water sources. This affected my physiological state so much that the stress carried over to my emotions and I actually broke down in tears on mile 8 out of sheer frustration. We actually didn’t get to see Sunset Lake because by the time we got to the High Sierra Camp in the area, sundown was near and the lake was another 1.5 miles. It’s quite dangerous to be hiking in the dark. This was a bummer but it was for our own safety.
- Time taken (includes lunch break) : ~9 hours
Day 4 – Sunset to Cathedral Lakes
This day we decided to take it easy after our brutal Day 3 and have a half-day of hiking. We took our time waking up and started our day around noon.
- 6 miles from our camp site
- Level: Moderate
- The trail is overall quite flat with a gradual incline into steady decline when approaching Upper Cathedral Lake.
- There was minimal shade on the trail. Sunscreen and Sunglasses were essential!
- We camped a little distance from the lake over some rock formations. Campfires are not allowed here.
- Time taken : ~2 hours
Day 5 – Cathedral Lakes to Tuolumne
Our last few hours in Yosemite was approaching. My backpack was much easier to carry as most of the food packed were consumed.
- 5.5 miles from our camp site
- Level: Moderate
- This trail was a downhill incline that was 3/4 gradual. The remaining 1/4 was a steep downhill switch-back.
- The trail was mostly shaded by pine trees. It was pleasant to have my last hike in Yosemite this way.
- After finding our way to our car rental, we headed straight to the park’s food establishment and celebrated with some burgers.
- Cleaned and returned the bear canisters and made our way back to San Francisco!
My Findings
- Feeling the delights of the simple things really increases your quality of life (for me anyway)
- How to be a minimalist
- How to pack more efficiently- I repackaged my meals and made sure to pack heavier items closer to my body with the more frequently used item towards the top
- Proper form in carrying the backpack
- It’s best to keep it close to the body and have your hip belt snug. It’s all about center of gravity.
- I strengthened my fire building skills ^__^
- How to suck it up when feeling like the lactic acid in my muscles 🙂
- How to overcome my lack of patience for my friend(s) …(they are my long-time friend(s) so nothing was taken personally)
Overall, I think I’d do it again with better preparation. As brutal as it was, in retrospect, it had positive effects on my mind, body, and soul. Being away from the regular first-world lifestyle was very rejuvenating. I genuinely found a renewed sense of gratitude for my life and our universe. I highly recommend everyone to do this once in their lifetime. It’s truly something you can only experience while being able-bodied. I learned a lot about myself through the physical and mental hardship and experiencing the phenomenal views of nature. I have a sense of confidence in dealing with the wilderness and gained a lot of survival knowledge. I do admit that it wasn’t always happy vibes throughout the experience, but the pros do out-weight the cons.
Photo Gallery
Below is a gallery of photos taken by iPhone and digital camera, edited by me. I will be adding more to it as I continue to receive photos from my friends. Hope you found this blog informative or interesting and that you enjoy these photos! Please do reach out if any questions!


Thanks for looking!
Love,
Styleleaf
